Showing posts with label Gamezone. Show all posts

Sunday, May 1, 2022

Undead chariot #2

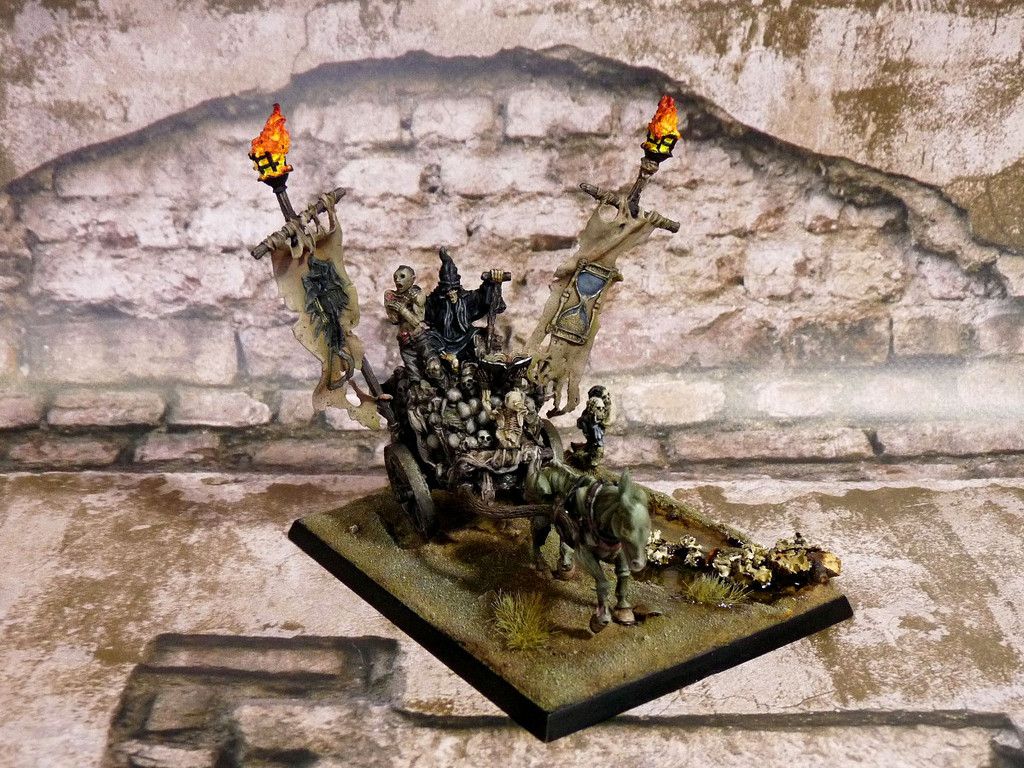
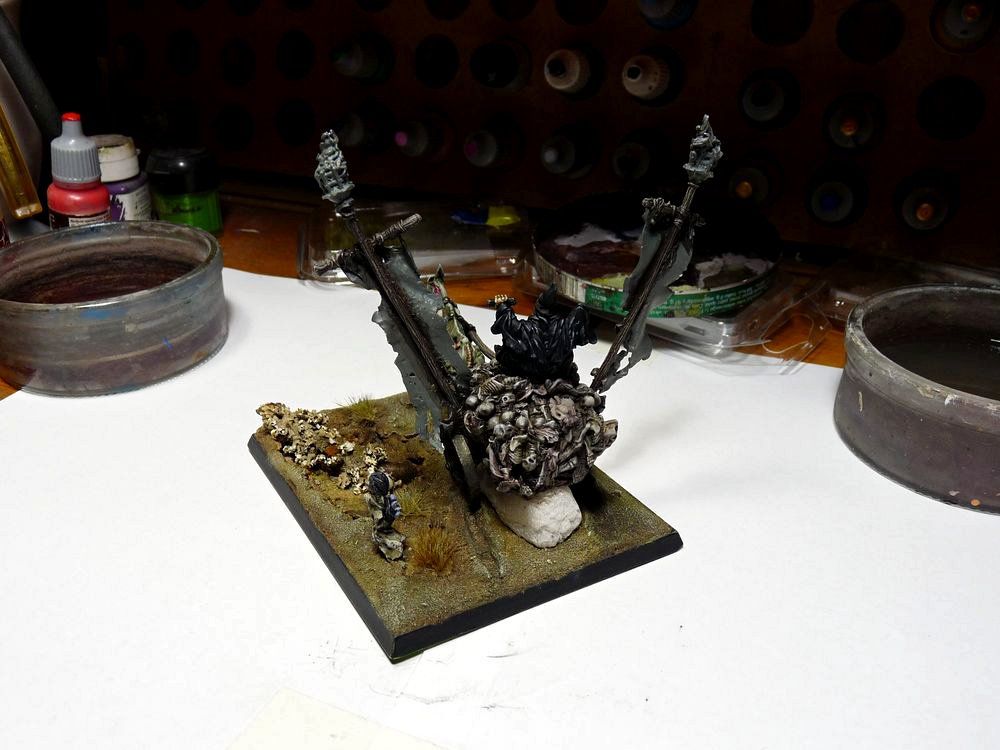
It took a little while since I painted the previous chariot, but now my deaders got another wheeler. As most of miniatures from this range, this one brought me back and I'm really glad I got opportunity to work on it. The chariot is really old piece and I got it recently in exchange for goblin wold riders set - never had any use for greenskins so I consider it great deal. 

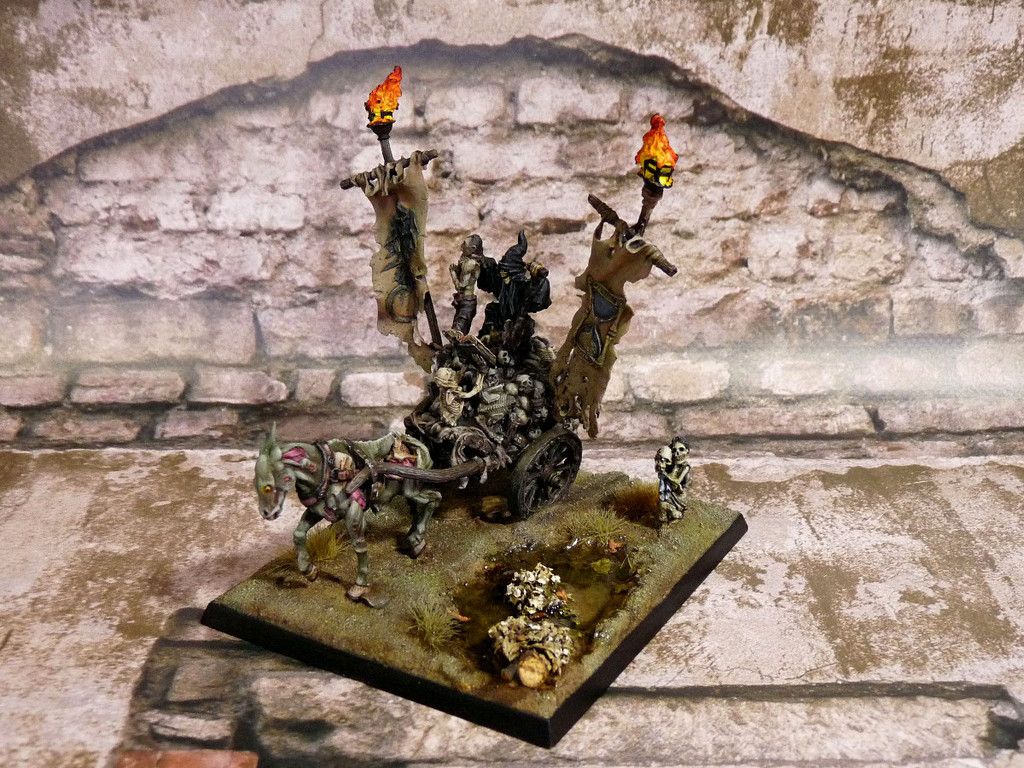
The model I got was painted and was mostly complete - scythes were missing and there was only one crew member so I added 2 more skellies from Wargames Factory to make the platform more crowdy. Speaking of which - I really like WF sculpts but assembling those bony models is just pain in the ass. Bony ass that is! 💀

I really like black and white stripes banners idea so the chariot also got one. Shambling horde of undead marching under banners like this should look supercool. Haven't decided yet should army standard should be the similar or maybe I should make up something else.


And all undead "heavy hitters" together. Looks lije there's one more chariot and Arkhan the Black himself yet to be done...

Monday, April 2, 2018

Undead chariot

Easter time kinda seems perfect for bringing some dead back to the world, so I'm more than happy I've finally managed to get onother Undead chariot done.

So I got this placcy set recently: 
back in the old days always wanted to see it on the table (all the automatic impact hits and shit) but for many reasons it's been unavailable for me. 
It's nice feeling having another "alwayswantedtopaint" model crossed off the wishlist.

The chariot is used piece. It came unpainted but assembled, with skeleton crew already attached (armed with classic set of weapons: lance and bow). 
Never liked this combo - undead are shit snipers, and imo carrying lance while riding chariot looks just fucking stupid. So quick surgery and both skellies were ready for arm swapping.

Basic idea was adding another crewman (wight or standard bearer) and skellies were supposed to be the (dead)bodyguards - so they got basic hand to hand weapons.
I couldn't find proper wight for the leader while assembling skellies but luckly there were 'nuff body parts to raise a zombie, which after painful orthopedics and necromancy treatment was turned into standard bearer.

I must say those placcy GW zombies were poor models, stupid parts, big Mickey Mouse hands. Couln't find any nice (acceptable...) looking head so I borrowed one from Mantic Games range - it's smaller than GW's but looks just way better.
After varnish and superglue dried I must admit I like this necro wheeler, wouldn't mind painting another one, but this time just bones - no rotting flesh aboard:


The model got 3x4" base - I can imagine it's not game wise but large base look just better on the table. Painting itself wasn't much complicated:
base tone, washing, drybrushing, glazing to get whole thing smoother, varnish.
More less.


Standard bearer was assembled using what I've managed to salvage from the bits box. 
It took a while to cut, pin and reposition arms and banner to get reliable bond, but it was worthy effort: the guy has fallen several times off my desk and nothing broken off (yet).
Instead of using banner from the armybook I decided to paint simple black and white stripes:
such thing looks really striking on the table so same pattern was used for skeleton crew and zombie horseman shields.


Since there are no metal parts (construction is very light) some superglue and greenstuff were enough to attach the deaders onto the board, but I think if there'll be next one I'll rather use long pins so crew members are nailed to the very base.
Hope you like the result:


Anything else mini-related?
Yup!
I've finally decided to wash some junk which has been sinking in the paint stripper for quite a long time now. So long that I've actually forgotten what was inside...
It's great to know there are at least 5 more oldie zombies for my main Undead unit.
Not mentioning ork shaman riding wyvern which I've always wanted to see painted.
Decisions, decisions...


Ok, take care for now!

Thursday, September 17, 2015

Lich Lord (not Lichemaster though) - review and walkthrough, part 5

It is finished! The paintjob is done!
Finally! That was traumatic experience and it's SO good to have it behind me.

As I wrote it the previous posts working on this thing was huge pain in the ass. I think the worst thing was assembly - that is model had to be painted assembled so manipulating was just very uncomfortable. Best example - banners. Painting them separated would be much easier and would bring better results than what you can see. I also didn't like sculpted sandglass and death - I'd prefer these banners plain or sculpted a'la Henrich Kemmler's apron - assembled bits of face skin. Really grim and totally badass!

As for the good things: all in all I like it, it's pretty striking sculpt which will surely pop out of infantry regiments. It's messy but I wouldn't expect anything cleaner from long dead evildoer.

What next?
Well in the meantime I managed to get some oldie Undead (heh, history made a full circle - I got rid of of core of my Undead army like 10 years ago?) and I'd like to build small, oldschool army, based on ~4-5 WFB edition models, or at least 90s' stuff.
Don't think that will be gaming but should look just cool in the display case.

Ok, that's it for now. Time to plan the overall shape of Undead army. And play Dark Omen!

And just to keep things more less tidy - here are links  to prior Lich lord posts if anyone's interested: part 1, part 2, part 3 and part 4. See you soon!


Friday, September 11, 2015

Lich Lord (not Lichemaster though) - review and walkthrough, part 4

Slowly  we're reaching the end of the journey.
Thank gods for that...

Anyway this time I managed to:
- paint main (dead) body of the cart,
- attatch it to the base,
- attatch it to the apocalypse pony,
- paint the base.

Working on the cart main structure was hard - not mentioning problems with manipulating based model it was simply boring: there's lots of skulls and bones to paint. I decided to paint the cargo with dirty tones - browns and chalks were addsed to glazes and washes to make the thing look natural (as much as natural pile of remains can be that is).
Same chalks were added for shading wooden and metal elements - such thing makes the piece look coherent.

At this stage lich is not much more than some rags and handful of bones so it was painted black - the dark cherry on Nagash's birthday necro-cake. I thought that should make it pretty eyecatching - dark character sitting on a top of much brighter bones. The banners will also be bright - no idea what tone at this moment though.

As mentioned above model was attached to the base - lots of greenstuff was put under wheels and to connect cart with the horse, but it was absolutely necessary. It is supposed to be gaming model and because of nature of the sculpt - solid pinning was not an option.

The base itself is just sand washed with browns and olives and then drybrushed with bright olive and bleached bone. there will be artifical water in the hole but it's the very last step. I will also sprinkle some dirt / mud  but again - whole thing must be painted first.

What's left?
Apart from basing there is a zombie which lich is raising from the deaders pile (no idea what's he doing actually, I know he's grabbing zombie's neck), there's a skeleton holding ye magick booke (I will paint it nice and clean, dry bones - better contrast with rest of corpses) and of course: banners.
Frankly I wouldn't mind if those were just stripes of leather (maybe something like Lichemaster's cloak) but banners with sculpted patterns should also look decent. I think I will paint them like rotting flesh - that should look striking and make the rider even more visible.

Piccies time. The next post should be the last about this case:


Deeply hope the next post will be the very last about this case.

Friday, September 4, 2015

Lich Lord (not Lichemaster though) - review and walkthrough, part 3

Hey again, the painful adventure continues.

Since the last time I managed to slap some paint on the lil' skellie and the pony.
That doesn't seem to be much but this model doesn't want to cooperate at all. There are minis you enjoy painting and there are the others.
Chariot of the Harvester is one of the others.

Since there was not much painting there cannot be much babbling (this time).
I painted the dead kid first - it's nice accent, pretty wicked. This character is just some bones wrapped in dirty rag so paintjob is neither spectacular, but the sculpt is cool:
it's very delicate - there's lots of fine details. There's also creepy bit - the skellie is carrying skeleton-ragdoll on it's right arm.

There was more fun painting the pony.
It was painted with olives and some broken reds for the contrast. It turned out rather bright but that should contrast nicely with dark base and dark chartiot frame.
This sculpt is very delicate - it's legs are so raw-boned I didn't dare to pin them. Instead I glued bars (or whatever the proper name of those bits of metal under minis feet is) straight into base. Model has already been varnished but I am planning to sprinkle some mud on it when the chariot is ready. Maybe not as much as on my Gone muddin' painting challenge entry but there still should me lots of mess.

Ok, pics time. And speaking of rotting ponies - clicky!


And that's how big the thing will grow.
It will be more impressive because of large banners on each side.
Really cannot wait to see it done... No more Gamezone. Speaking of which - I should have spare GZ knight (a'la EE Empire / Bretonnia) if anyone needs.


Laters!

Monday, August 24, 2015

Lich Lord (not Lichemaster though) - review and walkthrough, part 2

So here's the second part of my adventure with painitng Lich Lord.
Painful adventure as it turned out...

The next step is basing:
in case of "ordinady" models (that is: minis which cooperate with me instead of just being pain in the ass) I prepare the base, mount model on it and even sometimes - paint it first. The matter of personal taste that's all, basing is just fun.

In case of this one everything was more tricky:
model is made of several parts, it's pretty unbalanced and heavy which made painting it already based impossible. Assembling it also wasn't easy (lots of greenstuff was used to fill the damn gaps and make bits stick together) so in my opinion painitng the parts separated and assembling them later would not me a good idea.
So the decision was made to paint a pony and dead girls already on the base and other parts - separated. Base itself will be painted as the last thing.

As you saw in the first part of the walkthrough I used placcy GW regiment base: it's big enough for a chariot and it also has borders around so it's fine for applying artifical water. Weird thing: I was taking pics from the very beginning but when pics were downloaded it turned out some of them were missing and other - very blurry. By some mysterious way autofocus was off. But I should've expected paranormal activity - it's lich after all...
Paranormal or not - I managed to save only pics below so as for stuff you cannot see you'll just have to believe in my babbling.

First the base was filled with cork (around place I chose for the "pond" to get irregular, natural edges) and ~5 mm thick foamcore. I must admit I chose foamcore only because it was easier to fill the space than cutting and assembling cork. Then everything was covered with 2 layers of white glue and sand.


Then I realised a wagon filled with dead corpses crossing swampy area would surely leave deep tracks rather than just gently step on the very top of sand layer. 
Like some sort of wicked necro-ballerina... Jumbo size...
Carving thick layer of sand would be pretty hard so just made 2 brownstuff "sausages" and made the tracks on the sand layer. In the end there will also be some vegetation, foliage and fallen leafs (lots of damp trash) so it should be no problem.


Everything as covered with sand again.
Damn you lich, damn you and your autofocus sabotaging!!!


I marked places where models will stand and drilled holes for the bars.
At this stage I was really happy I chose foam board: it's easy to work with but it's just great for pinning models into. Except in this case there will be not much pinning. Gamezone stuff I got is really thin and fragile I am quite sure any attempt of drilling would simply break the limbs. Pain in the ass.


And here's the first painting-patient: dead girl. 
Pretty wicked idea - you cannot see it on the pic but this litle lady is carrying skeleton doll on it's rigth arm. Some greenstuff was put into the hole in the base, then superglue applied, models was pressed into this and surface was masked with sand. Bulletproof bond.

This model will be kinda test model for swampy colors to be used. I want to keep whole thing in rotten / greenish hue but we'll see whan happens. Whan I know for sure is I will try to paint very dark, deep shadows on the chariot to hide all gaps I didn't manage to cover properly with greenstuff. Wish me luck.

Wednesday, August 5, 2015

Lich Lord (not Lichemaster though) - review and walkthrough, part 1

I just love liches,
the dead ones, not those disguisting bloodsucking worms.
These rotten bastards are the essence of dark side of fantasy, perfect as background of most RPG adventures and challenging opponents in the battlefield. In my vision that is.
I remember player could choose Lich as Undead general in Warhammer 4th/5th edition but those times each and every gamer preferred badass Vampire Lord. Who wouldn't?
Anyway years passed, since old and careless Warhammer days I painted lots of minis (2 Heinrich Kemmlers among them) and recently I thought it would be cool to see oldschool style evil force in the display case: shambling zombies, bat swarms, undead constructs and of course liches leading them. 
All in dark, wet and dirty colors - nothing like that ridiculous Tomb Kings of Khemri.

My first lich-thought was mr Kemmler of course. It's just friggin' ubercool model, I painted 2 and really wouldn't mind painting another (drop me a PM or comment if you have spare one). There's also damn cool lich from Otherworld miniatures but for the centerpiece I needed something bigger. Something like Gamezone's Harvester.

About month or so the order was placed and last Monday postman delivered something nice to my office. It's pretty large model so I decided to write multipart review + simple painting walkthrough. Finishing the piece might take some time.

To the model came in nice looking, cardboard box with comfy sponge inside - safe and sound. The box looks really nice so it's good idea for a x-mas gift. Or just any other gift.


The model is built of several metal parts - the sculpt is packed with details so painting it will probably cause some pain in the ass. But on the other hand spending some extra brush-time should provide really decent final result. It's the big boss after all!
There is only small placcy base for the pony but since I want it to be centerpiece the decision was made to put it on oldie EE regiment base. The model should be much safer pinned to such thing and besides there's lots of space for more themed details - tombstones or emerging zombies for example.

So far I haven't spotted any nasty mold lines but assembling whole construction will also require extra attention: the big elements simply doesn't fit as they should. There'll be lots of pinning and greenstuff used for sure.


At this stage I don't have some strict idea for the painting so if you have some suggestions - post them, there'll be some time until part #2 is ready.

Cheers!

EDIT:
For the part #2 - click here.